according to the each alignment mark put on before; and then tighten and adjust them to the specified torque; value to avoid stress to the DPF muffler.- Page 168
Kubota L3560 Owners Manual
Table of Contents
ENGINE
L3560, L4060, L4760, L5060, L5460, L6060, WSM
1-S21
(Continued)
(When reassembling)
NOTE
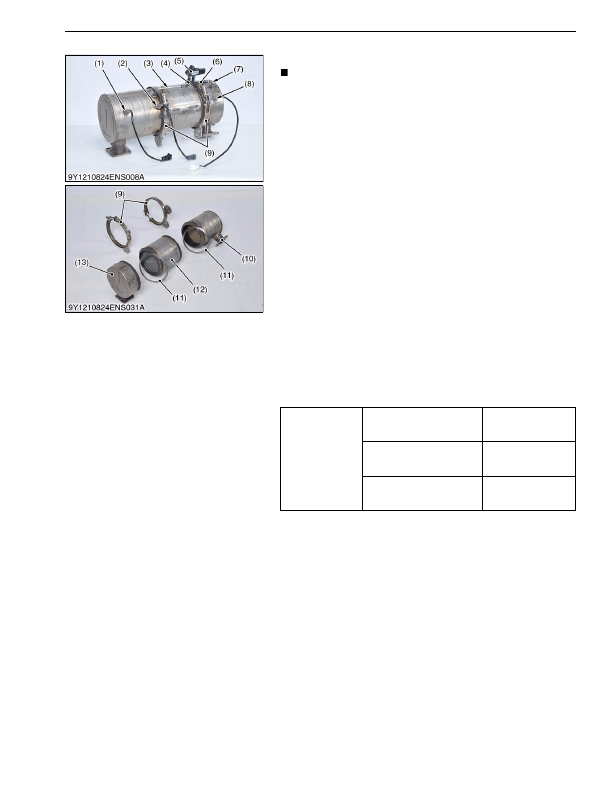
• Assemble DOC, DPF, DPF outlet body and DPF stay 1
according to the each alignment mark put on before
disassembling.
• Temporary tighten stay 1, stay 2 and muffler flange first,
and then tighten and adjust them to the specified torque
value to avoid stress to the DPF muffler.
• Replace the gaskets (11) with new ones.
• If the differential pressure hoses (4), (6) are damaged or
cracked, replace it.
• When the differential pressure pipes (3), (7) and temperature
sensors (1), (2), (8) are removed, wipe off the anti-seize &
lubricating compound, apply a anti-seize & lubricating
compound (Bostik, NEVER SEEZ, Pure Nickel Special Grade),
and then attach them to their correct position.
• When replacing the differential pressure pipes (3), (7) apply a
anti-seize & lubricating compound (Bostik, NEVER SEEZ, Pure
Nickel Special Grade), and then attach it to its correct position.
• When replacing the temperature sensor, check that it is coated
with anti-seize & lubricating compound, and then attach it to its
correct position.
• Tighten bolts and nuts to their specified torque. Also tighten the
temperature sensor tightening nut or the differential pressure
pipe tightening nut to the specified torque with crowfoot wrench.
• After attaching the assembly, start the engine and make sure
that there are no gas leaks.
• Reassemble the Diesel Particulate Filter (DPF) (12) in the
correct direction.
9Y1210824ENS0016US0
Tightening torque
Filter comp (DPF) mounting
clamp band
16 to 20 N·m
1.7 to 2.0 kgf·m
12 to 14 lbf·ft
Temperature sensor
25 to 34 N·m
2.5 to 3.5 kgf·m
18 to 25 lbf·ft
Differential pressure pipe
16 to 22 N·m
1.6 to 2.3 kgf·m
12 to 16 lbf·ft
(1) Temperature Sensor (T
0
)
(2) Temperature Sensor (T
1
)
(3) Differential Pressure Pipe
(4) Tube
(5) Differential Pressure Sensor
(6) Tube
(7) Differential Pressure Pipe
(8) Temperature Sensor (T
2
)
(9) Filter Comp (DPF) Mounting Clamp
Band
(10) Diesel Oxidation Catalyst (DOC)
(11) Gasket
(12) Diesel Particulate Filter (DPF)
(13) DPF Outlet Body
KiSC issued 03, 2016 A
Detailed Information for Kubota L3560 Owners Manual
Lists of information found in Kubota L3560 Owners Manual - Page 168
- 1.7 to 2.
- 2.5 to 3.
- 1.6 to 2.
- Assemble DOC, DPF, DPF outlet body and DPF stay 1 according to the each alignment mark put on before disassembling.
- Temporary tighten stay 1, stay 2 and muffler flange first, and then tighten and adjust them to the specified torque value to avoid stress to the DPF muffler.
- Replace the gaskets (11) with new ones.
- If the differential pressure hoses (4), (6) are damaged or cracked, replace it.
- When the differential pressure pipes (3), (7) and temperature sensors (1), (2), (8) are removed, wipe off the anti-seize & lubricating compound, apply a anti-seize & lubricating compound (Bostik, NEVER SEEZ, Pure Nickel Special Grade), and then attach them to their correct position.
- When replacing the differential pressure pipes (3), (7) apply a anti-seize & lubricating compound (Bostik, NEVER SEEZ, Pure Nickel Special Grade), and then attach it to its correct position.
- When replacing the temperature sensor, check that it is coated with anti-seize & lubricating compound, and then attach it to its correct position.
- Tighten bolts and nuts to their specified torque.
- After attaching the assembly, start the engine and make sure that there are no gas leaks.
- Reassemble the Diesel Particulate Filter (DPF) (12) in the correct direction.