Front Windshield; having the specified tip shape as shown in the figure left.; windshields should be - Page 798
Kubota L3560 Owners Manual
Table of Contents
CABIN
L3560, L4060, L4760, L5060, L5460, L6060, WSM
10-S55
Front Windshield
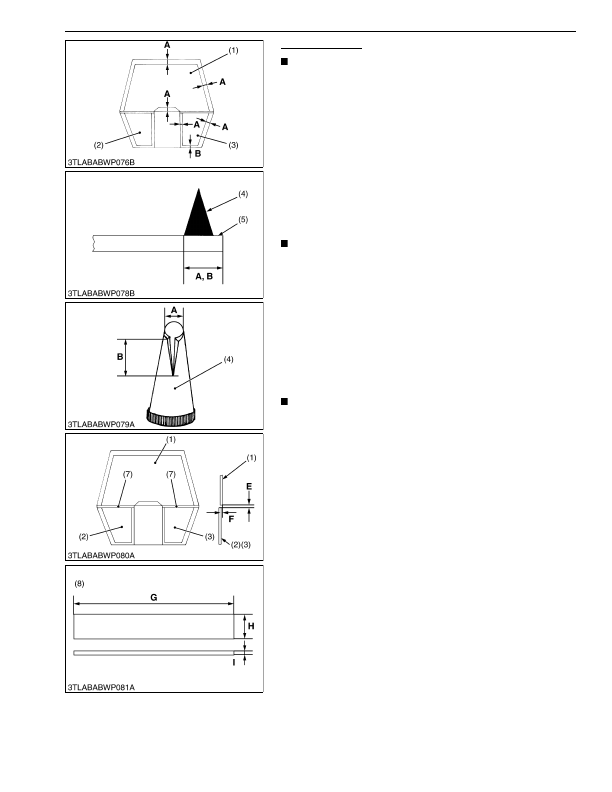
NOTE
• Apply the Sika Tack-Ultrafast (or equivalent) with the jig
having the specified tip shape as shown in the figure left.
• Apply it with a uniform speed to minimize unevenness.
• Follow the instruction manual of Sika Tack-Ultrafast.
1. Apply the Sika Primer 209 on the cabin frame
"A"
and
"B"
in
the figure.
2. Apply the Sika-Activator (5) on the windshield
"A"
and
"B"
in
the figure.
3. Apply the Sika Tack-Ultrafast (4) on the windshield
"A"
and
"B"
in the figure.
4. Install the lower (left or right) windshield to the cabin and fix it
with a gummed tape.
5. Set the upper windshield to the cabin and fix it with a gummed
tape.
NOTE
• Use a jig (8) shown in the figure to create even clearance
"E" [approx. 5 mm (0.2 in.)] between the lower and upper
windshield.
• The level unevenness between the upper and lower
windshields should be
−
1 to +1 mm (
−
0.04 to +0.04 in.) or
less at the windshield surface.
6. Leave it for one hour.
7. Remove the jig (8).
8. Install the H rubber (7) between the lower and upper windshield
(2), (3).
9. Apply the Shin Etsu silicon KE420 in H rubber (7).
10. Apply the Shin Etsu silicon KE420 on the edge of H rubber (7).
NOTE
• When the gummed tape is removed, the glass may be
displaced. In this case fix it again.
• Remove the gummed tape (adhesive tape) little by little to
check the bonding condition.
9Y1210824CAS0095US0
(1) Upper Windshield
(2) Lower Windshield (Right)
(3) Lower Windshield (Left)
(4) Sika Tack-Ultrafast
(5) Sika Activator
(6) Jig
(7) H Rubber
(8) Jig
A: 10 mm (0.39 in.)
B: 12 mm (0.47 in.)
C: 8 mm dia. (0.31 in. dia.)
D: 12 mm (0.47 in.)
E:
5 mm (0.2 in.)
F:
−
1.0 to +1.0 mm
(
−
0.04 to +0.04 in.)
G: 360 mm (14.2 in.)
H: 20 mm (0.8 in.)
I:
5 mm (0.2 in.)
KiSC issued 03, 2016 A
Detailed Information for Kubota L3560 Owners Manual
Lists of information found in Kubota L3560 Owners Manual - Page 798
- 1. Apply the Sika Primer 209 on the cabin frame "A" and "B" in the figure.
- 2. Apply the Sika-Activator (5) on the windshield "A" and "B" in the figure.
- 3. Apply the Sika Tack-Ultrafast (4) on the windshield "A" and "B" in the figure.
- 4. Install the lower (left or right) windshield to the cabin and fix it with a gummed tape.
- 5. Set the upper windshield to the cabin and fix it with a gummed tape.
- 6. Leave it for one hour.
- 7. Remove the jig (8).
- 8. Install the H rubber (7) between the lower and upper windshield (2), (3).
- 9. Apply the Shin Etsu silicon KE420 in H rubber (7).
- 1.0 to +1.
- 14.2 in.
- Apply the Sika Tack-Ultrafast (or equivalent) with the jig having the specified tip shape as shown in the figure left.
- Apply it with a uniform speed to minimize unevenness.
- Follow the instruction manual of Sika Tack-Ultrafast.
- Use a jig (8) shown in the figure to create even clearance "E" [approx.
- The level unevenness between the upper and lower windshields should be − 1 to +1 mm ( − 0.
- When the gummed tape is removed, the glass may be displaced.
- Remove the gummed tape (adhesive tape) little by little to check the bonding condition.